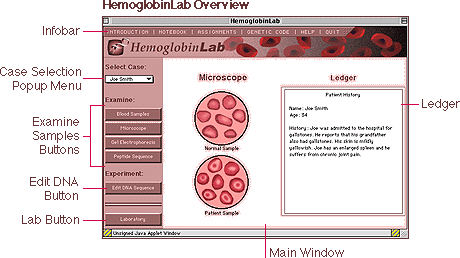
INFOBAR
The tabs at the top of the screen allow you to access the Introduction, Notebook, Assignments, Genetic Code, and Help. There is also a tab that allows you to Quit the applet. These tabs will lead you to information and tools that are outside the applet itself.
Notebook: Brings up the lab notebook in which you can record your progress as you work through the lab.
Assignments: Loads the Assignments page in the main browser window.
Genetic Code: Loads a Genetic Code Chart in the main browser window.
Help: Brings you to this screen.
Quit: Brings up a confirming dialog box. If confirmed, the applet will quit and any work in progress will be destroyed.
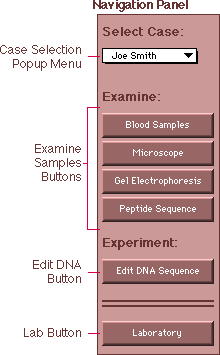
Case Selection Popup Menu: The Case Selection Popup Menu offers a list of patients to study. There is a blood sample from each patient, which you can examine in various ways.
To select a new case, hold the mouse button down over the case listed. You should see a list of possible cases. Move the mouse to the one you want and let go.
Although you may choose to select one case and analyze it thoroughly, you may compare cases at any time by switching between the cases via the "Select Case" choice button. You may do this from any screen, but only the screens that allow you to examine the blood sample will change visibly (those screens include Blood Samples, Microscope, and Gel Electrophoresis).
Navigation Buttons: These buttons allow you to move through the applet. The first four buttons, under the heading "Examine," allow you to examine the patient's blood sample in various ways (see below). The Edit DNA Sequence and Laboratory buttons take you to the DNA Editor and to the Laboratory, respectively. You may progress through these screens in any order, and you may return to a previously visited screen at any time.
Microscope: This button takes you to a screen where you may analyze the patient's blood sample under a microscope to view shapes of the blood cells. A sample of normal blood is shown for comparison. This screen also shows the Ledger, which contains background information about the patient. (There is more information on the Ledger below.)
Gel Electrophoresis: This button brings up a screen that shows the results of a gel electrophoresis experiment comparing the patient's blood sample with a normal sample. This appears on the left side of the main window. On the right the Ledger is once again shown, containing background information about the patient. (There is more information on the Ledger below.)
Peptide Sequence: This button takes you to a screen showing the results of sequencing the hemoglobin protein beta subunit from a normal sample and from the patient's sample. Each oval represents an amino acid.
You can scan through the chain by using the arrow buttons under the Patient's Sequence. The single arrows move the chains one amino acid at a time in either direction. The double arrows move the chains one screen at a time. If you know what amino acid number you would like to see, use the "Go To" box at the center. Type in a number and hit return to jump to that amino acid number.
At the bottom of the screen a "Find Difference" button allows you to view the differences between the patient's sequence and the normal sequence. After you find the first difference, clicking on "Find Difference" again will jump to the next difference in the chains or will display "No further differences" at the bottom of the screen.
The Ledger does not appear on this screen.
Edit DNA Sequence: This button takes you to the DNA editor, where you can modify a strand of normal DNA, translate it, and compare the resulting peptide sequence with that of the normal hemoglobin and of the patient's hemoglobin. There is more help on the DNA Editor below. The Ledger does not appear on this screen.
Laboratory: This button brings up the opening screen, which shows you all the equipment you will use within HemoglobinLab. To learn more about the equipment, move your mouse over a piece of equipment until you see a red box around it. Click on the equipment and you will see a brief description of what it is and what it does.
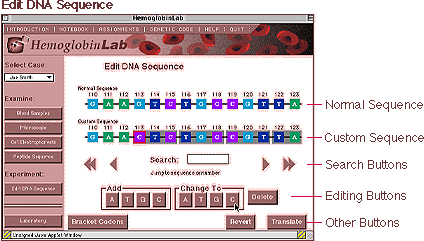
A Adenine G Guanine C Cytosine T Thymine
When you click on a nucleotide in the Custom Sequence, it highlights and becomes the selected nucleotide. Several of the operations explained below act on or refer to the selected nucleotide.
Navigating and Searching the Sequence: You can navigate through the DNA sequence much as you did in the peptide sequence. The single arrow buttons move one nucleotide at a time, while the double arrow buttons move a screen at a time. The "Search" box at the center allows you to either to jump to a paticular nucleotide number or search for a specific nucleotide sequence. If you want to jump to a nucleotide number, type the number in the box next to "Search" and hit return. If you want to look for a sequence, type any number of letters (a,g,c, or t) into the box and hit return. The applet will search for the sequence you typed starting from the selected nucleotide. If no nucleotide is selected, the applet will search from the beginning of the sequence. To search for the next instance of your letter(s), simply hit return again after the first match is found.
Editing the Custom Sequence: In order to edit the Custom Sequence, use the buttons under "Add" and "Change To" and the "Delete" button. You must have a nucleotide selected in order to use these buttons.
Add Clicking on one of the four buttons under "Add" will add a nucleotide of that type before the selected nucleotide. Change To Clicking on one of the four buttons under "Change To" will change the selected nucleotide to a nucleotide of the type named on the button. Delete Clicking on the "Delete" button will delete the selected nucleotide.
Other Buttons: The "Bracket Codons" button at the lower left of the editor screen will group the nucleotides into threes (codon length) starting from the selected nucleotide.
The "Revert" button will restore the Custom Sequence to an exact replica of the Normal Sequence. NOTE: There is no undo from the "Revert" button; your previous edits will be lost.
The "Translate" button at the lower right of the editor screen will translate the DNA sequences into proteins. It will display the proteins in a Peptide Sequence screen, much like the Peptide Sequence screen described above. This time, however, you will see three sequences: the normal hemoglobin, the patient's hemoglobin, and your custom hemoglobin. When you choose "Find Differences" it will show differences between the patient's hemoglobin and your custom sequence.
LEDGER
The Ledger displays information about each patient. It is only visible on certain screens (Blood Samples, Microscope, and Gel Electrophoresis). It shows the patient's name, age, and a short case history that includes symptoms, past illness and/or treatments, and sometimes information about the patient's relatives. It is provided to give you more information about the physical results of each type of mutation.
NOTEBOOK
As you run experiments, form hypothoses, and test them, you should
keep notes on your theories and findings in the HemoglobinLab
notebook. You may access the notebook at any time from the Infobar.
The notebook will open up in a separate window.
Control Buttons: You will see a row of control buttons at the bottom of the notebook window. These include Close, Export, and Undo Edit.
Export: The current contents of the notebook are exported to a temporary HTML file. This file is then opened in your browser. Exporting your notes allows you to print them when you are done with your assignment. NOTE: Extremely long notes will cause machines to hang when trying to export. If you are running many experiments, it is best to print your notes and clear the notebook occasionally.
Undo Edit: Any changes you have made to the notebook since it was last opened will be removed, restoring it to its state when it was opened.